We decided to try a muffin tin meal for breakfast. I was surprised that the oatmeal and bananas were a big hit over the more frequent toast or cereal.
Special K
banana slices
toast with butter
oatmeal (plain with raisins added)

Sunday, November 30, 2008

Saturday, November 29, 2008
Tour de Tucson
Last weekend we went to cheer on my husband at the Tour de Tucson. There is just something so sweet about a handmade banner.

Thursday, November 27, 2008
Crayon tutorial
To celebrate my 300th sale I am saying "thanks" by "giving" you all a tutorial on how I make my crayons. Happy Thanksgiving.
A Green Guide to Fabulous Crayons
How to make cool new crayons from yucky old ones.

This is a fun project for kids and adults to do together. Please read the directions all the way through before starting.
Materials you will need:
Old crayons
Plastic tablecloth
Knife
Cutting board
Disposable muffin tins
Foil
Cooking sheet or Roasting pan
Toothpicks
Candy molds
Oven
Freezer
Crayons roll. If you are a parent, you have crayons under the couch, in the back of drawers and at the bottom of the toy box. Get your little ones to gather them up and have them help you transform them into new fabulous crayons they won’t want to lose track of.

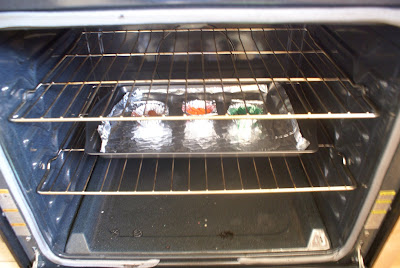
Watch them melt. Place muffin tins on a baking sheet or roasting pan lined with foil. Once inside, turn on your oven light and watch the crayons change from a solid to liquid. A great little science experiment that takes 10-15 minutes.
 Hot stuff! After your crayons have melted remove from the oven. I let them cool for a minute or two until I can pick them up with my hands. This is another grown up job but kids love to watch. Pick a mold and pour. I fill all the way to the top. It can get a little messy but once the crayon cools you can snap off any parts that ran over.

 Chill out. Now that you have filled your mold let them sit 2-3 minutes until firm. Once the top no longer moves they are safe to transfer. Find a flat spot in your freezer to set the mold on. Let your crayons get nice and hard, 10-15 minutes before removing from the freezer.

Pop! Kids love this part. Flip your mold over and the crayons will pop right out. Remember, they are still just crayons and can break so try not to drop them too far.
A Green Guide to Fabulous Crayons
How to make cool new crayons from yucky old ones.

This is a fun project for kids and adults to do together. Please read the directions all the way through before starting.
Materials you will need:
Old crayons
Plastic tablecloth
Knife
Cutting board
Disposable muffin tins
Foil
Cooking sheet or Roasting pan
Toothpicks
Candy molds
Oven
Freezer
Crayons roll. If you are a parent, you have crayons under the couch, in the back of drawers and at the bottom of the toy box. Get your little ones to gather them up and have them help you transform them into new fabulous crayons they won’t want to lose track of.
Cover it up. I protect my working surface with a plastic tablecloth I purchased from the dollar store. This catches the tiny crayon pieces and even the hot wax if I get a little messy. When I’m finished I wipe clean, fold and store for next time.
Sort it out. I sort all my crayons first however, this step depends on how many crayons you are working with at one time. You may want to peel and sort as you go. You can use anything from plastic bags to recycled butter tubs to organize your crayons. I found that disposable food containers are a good size for me.
Peel baby. This is my least favorite part of the process. I use an old knife to make a slit down the length of the crayon paper. This requires cutting and should be done by an adult. I do think little fingers make for the best peelers though. Some papers will pop right off, while others take a little more work. I have surrendered more than one crayon to the trash. You can’t win them all.
Snap and bake. Preheat oven to 215 degrees. Take your now naked crayons and snap into approximately 1 inch (3 cm.) pieces. To melt my crayons I use disposable muffin tins. I cut these apart so they can be poured one at a time. I fill my tins close to the top to make several crayons at one time. I also use all the same color crayon for the most even results (for crayons with mixed colors see directions for crazy crayons that follow). Candy molds will vary in size.
Watch them melt. Place muffin tins on a baking sheet or roasting pan lined with foil. Once inside, turn on your oven light and watch the crayons change from a solid to liquid. A great little science experiment that takes 10-15 minutes.
Hot stuff! After your crayons have melted remove from the oven. I let them cool for a minute or two until I can pick them up with my hands. This is another grown up job but kids love to watch. Pick a mold and pour. I fill all the way to the top. It can get a little messy but once the crayon cools you can snap off any parts that ran over.Chill out. Now that you have filled your mold let them sit 2-3 minutes until firm. Once the top no longer moves they are safe to transfer. Find a flat spot in your freezer to set the mold on. Let your crayons get nice and hard, 10-15 minutes before removing from the freezer.Pop! Kids love this part. Flip your mold over and the crayons will pop right out. Remember, they are still just crayons and can break so try not to drop them too far.
Enjoy! Don’t worry if they don’t come out perfect the first time. You can always melt them again.
Tuesday, November 25, 2008
lmnop magazine
 What a great day for my little shop.
My Jewel Crayon Set was chosen by lmnop magazine for their 2008 Ultimate Gift Guide. It is so cool to be included with so many fantastic toys for kids. This magazine has such incredible photos and unique items, I am so humbled to be part of it.
In addition, I hit 300 sales today (happy dance).

Sunday, November 23, 2008
Muffin tin meal - Thankful
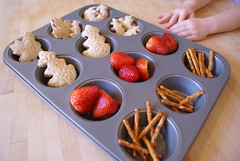
We are thankful for:
Peanut butter and jelly sandwiches
Strawberries and
Pretzels
Also fall leaves (PBJ), berries and twigs which we see very little of in Arizona.
Check out more muffin tin meals at Her Cup Overfloweth.
Friday, November 21, 2008
Christmas preparations
 The problem with making gifts for your family is finding the time to do it. Several mornings this week I was up early working away like a little elf. Planning, cutting and stashing away projects. I'll have to do most of the sewing when the girls are out of the house but I'm trying to get it all organized so I can whip them out when I the right time comes.
 Here is what is on the list so far. These beautiful fabrics will become purses for my nieces. It is driving me crazy to have these just sitting behind me while I get organized. I can't wait to start working on them.
 These balls of colorful yarn may become legwarmers if I can ever figure out how to use my circular needles.
 Here are just a few of the felt pieces I will be using to make new play food for Erin. Yummy doughnuts, pancakes, and Christmas cookies are some of the items on the menu. If I have time I'd love to photograph them and make actual menus for their pretend play. For some more amazing felt food check out these great photos on Silvia Leite's flickr page.
I also have a dictionary, pajama pants, a kitty bed, and some really cool jello paints in the works. I can't remember the last time I was so excited about Christmas, and it is not even Thanksgiving. More pictures will be coming.
Monday, November 17, 2008
Little Blue Dress
 This dress was made back in September but Erin is just now getting around to wearing it. From the looks of the length it may not get to see the Spring sunshine. She told the director of her daycare "mommy knitted it for me".
  Notice how tall those beans are getting? The spinach on the other hand has had some nibblers.
Sunday, November 16, 2008
Muffin tin meal - dips
This weeks challenge is veggies and dips. I decided to put a Southwest twist on it and serve it up quesidilla stile. Barely a days goes by that a tortilla is not eaten in this house so I knew it would be a hit. The salsa did not get touched but Erin enjoyed the guacamole and Ava liked the sour cream. See more muffin tin meals here.

Saturday, November 15, 2008
Happy Belated Birthdays
 I am finally getting caught up on birthday presents. My poor nieces and nephews have been neglected this year. In fact one of the seven (from my husbands side) is celebrating her 7th today. With Christmas around the corner I decided I better buckle down and get something in the mail. I feel badly they were missed because I really do believe birthdays are special but maybe a surprise package in the mail will make it up to them. Instead of getting gifts for just the ones I missed I thought a big box of craft projects would be a perfect gift for all the kids as the days are getting colder. The crafts include bead kits, paint-a-heart pendants, paint-a-star magnets and make-a-monster finger puppet sets from my etsy shop. Fun, fun, fun. I wish we could be with them to dig in and create.
Whew, that is a big one crossed of my to do list. Now just on to making dentist appointments.
Thursday, November 13, 2008
soccer kid
 I need to post some pictures of Ava playing soccer before the season is over. There are two reasons. First of all she looks so darn cute in her uniform. I just love how all kids look in soccer gear for some reason. Second of all this may be our one and only season of soccer. If she is anything like me she tried it and will decide to move on. Those little legs were not built for running, or at least they have more growing to do. And if she chooses to continue to play I'll be there cheering on the sideline.

Monday, November 10, 2008
Sew, Mama, Sew!
 If you have not checked out the handmade holidays list on Sew, Mama, Sew! blog then you are missing out. I am thrilled that my Robot Crayons Set were chosen as one of two items under items to buy. Everyday in November a new themed list is posted. The list includes fun items grouped by; make it, buy it, mix it, share it, win it. My crayons can be found on November 10: Gifts for Elementary Kids. Want even more incentive to check it out? Leave a comment for a chance to win Amy Butler's new book, Little Stitches.
Sunday, November 9, 2008
Rock Star
 We have had a very exciting past few days. The highlight of the weekend for my girls was the Ralph's World concert. The girls were star struck from the minute they saw Ralph himself standing in the entrance when we arrived. Perfect photo opportunity but I forgot my camera. I have their little grins burned in my brain so that will have to do (but a picture would have been fantastic). It was a fun, rock'n concert. Ava enjoyed taking it all in from the 8th row but Erin was up and ready to dance. She even took advantage of the invitation to join the band on stage for the finale (with me and about 30 others). My mom came along for the fun and got the girls a CD on the way out. They have been singing the music all weekend.
This brings me to some more excitement. A sneak peek at one of several ideas I've been thinking about for my shop. My little rocker couldn't keep her hands off it so more are in the works.
Wednesday, November 5, 2008
The bottom of the box
 This morning I found myself sitting in front of this nearly empty box of boxes. I was faced with the decision of reordering more boxes (only $30 + shipping) and continuing to make crayons or to set them aside and move on. I'm not sure I really envisioned seeing the bottom of what seemed like a ridiculous amount of boxes, but that time has come. I have enjoyed the excitement of watching my sales numbers grow and reading convos from happy customers, but I have also had to tell my girls to "wait just a minute" more than I'd like. So in respect to my family I have chosen to put them first and let the crayons go.
 To celebrate we made "Mommy Waffles" (not the everyday Eggos) for breakfast followed by hugs that made what seemed like a big decision a silly one. Watching Erin lick the bowl has me looking forward to baking Christmas cookies, drinking cocoa and singing carols.
  Now, what to do with all those left over crayons?
Tuesday, November 4, 2008
Yikes! Look at all those crayons.
 It was a busy day at my house. My Jewel Crayon Set was featured on Etsy Finds: fun to grow on. Lucky for me it was a Tuesday when I have extra time for my shop. The orders came pouring in. At the end of the day I ended up taking 10 packages to the post office with a few more waiting for payment. It was pretty exciting but I couldn't help but notice that my supplies are dwindling. I even emptied my big box of boxes. I thought I'd never see the bottom of those 100 long boxes. Now I need to decide if I reorder my supplies or begin to transition to different items. It makes me a little sad to let something so successful go but I love a creativity challenge.

Sunday, November 2, 2008
Freezer Paper Stencils
I finally brought out my freezer paper today. I've had it in the closet for a few months and now that Halloween is over I'm on to new projects. As soon as I felt the heavy, waxy paper I knew this would be fun. I can't show you what I'm working on just yet but here is a t-shirt I love that I found on flickr. Somos Monos was nice enough to include directions so I don't have to type them out again. Check out the flickr group 'freezer paper stencils' to see many more cool designs.
Wayfarer Freezer Paper Stencil Shirt
Steps.
1) First off, I found an image i liked, then pushed up the contrast.
2) I then printed the image out, and traced it onto freezer paper.
3) Using an exacto-knife, I cut it and the lenses out.
4) I ironed on the freezer paper stencil, then placed the lenses, and ironed them on as well.
5) I applied fabric paint and let it dry.
6) then I peeled off the lenses and stencil
Saturday, November 1, 2008
Happy Halloween
Happy Halloween!


Something old (bakers dressups), something new (black leggins), something borrowed (witch hat), something mandmade (Jack Skellington jacket and bowtie).


Something old (bakers dressups), something new (black leggins), something borrowed (witch hat), something mandmade (Jack Skellington jacket and bowtie).
Subscribe to:
Posts (Atom)